Fixing a Clogged Nozzle in an FDM 3D Printer
Published On: 2022-12-06

Fixing a Clogged Nozzle in an FDM 3D Printer
A clogged 3D printer nozzle can cause problems ranging from missing layers to no filament at all. Read on to find out how to tell whether your nozzle is clogged, what's causing it, and how to clean it properly.
Signs the nozzle is clogged
There are a few warning signs that your 3D printer's nozzle is clogged. If no filament is being extruded onto the build platform, you may have a completely clogged nozzle. Material stringing, missing layers, clicking sounds in your extruder gears, and irregular extrusion patterns are all signs to look out for.
If the nozzle on your 3D printer seems clogged, there is most likely a blockage inside the nozzle preventing full material flow. If you encounter resistance in the nozzle, turn off the extruder gear and manually feed the filament through the heated nozzle. If the nozzle is not blocked, this should be a simple process, and the filament should travel smoothly through the nozzle.
Preventions
First layer: A blocked nozzle might be the cause of no filament extruding from the nozzle for the first layer. However, it's important to double-check that the issue isn't caused by the extruder, the Z offset setting, or an uneven bed.
Nozzle picking up material: The nozzle is usually the only issue; however, make sure you have a good Z offset and a flatbed
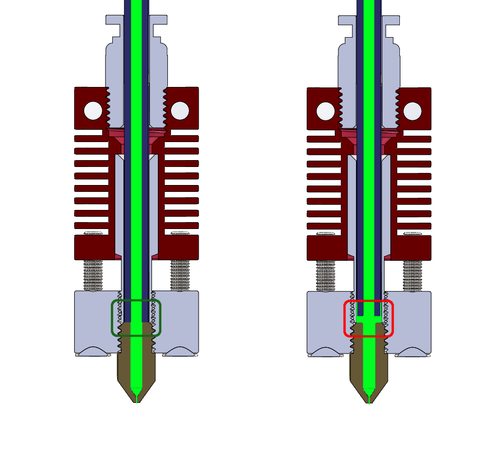
Hot-end jams: Ensure that the source of the jam is not the hot-end path (e.g., PTFE liner). Hot-end jams frequently appear to be caused by filament being caught or jammed in the middle and lower sections of the hot-end rather than the nozzle.
Inconsistent extrusion: This indicates that your printer is unable to keep up with the amount of material it is extruding. Check to make sure it isn't caused by a wet filament, the extruder's stepper motor (particularly its power), or the motor itself.
Under Extrusion: Check for damp filament, slack extruder tension, or a non-smooth filament path that might interfere with the print. This is a form of inconsistent extrusion that results in a print with evident missing sections.
Missing Print: Before beginning a print, double-check your nozzle diameter and temperature. If you return to a completed print with no layers created, it might be due to a blocked nozzle.
Debris on the nozzle: Excess melted material that adhered to the nozzle during printing is frequently the source of the debris on the nozzle's exterior. This is nearly always due to the nozzle being too low, which occurs frequently while printing the initial layer of printer filament. The fact that a substance clings best to itself exacerbates the situation.
This could be resolved by cleaning the nozzle of your printer while it is hot with a moist cloth or an alcohol wipe. It's also a good idea to use a silicone sock to cover the majority of the nozzle and keep too much material from adhering. Remove any leftover debris from the nozzle with a wire brush, tiny blade, or needle.
Clogs: Clogs occur when debris inside the hot end clogs the nozzle's output hole, preventing the filament from escaping. Nozzle clogs are classified into two types: partial and complete. Partial clogs occur when debris just blocks a portion of the exit hole; if you have either, you should clean your nozzle.
Servicing
If despite the aforementioned precautions, the nozzle becomes clogged, it must be cleaned and serviced by following these steps.
Needle Cleaning - This is one of the simplest methods for removing dirt from within the 3D printer nozzle. Begin by heating the hot end to the temperature of the most recent material 3D produced. Then, carefully poke upwards through the nozzle hole with a thin needle or wire, such as an acupuncture needle or a fine steel guitar string. This should break up the filament debris that is clogging the nozzle and let it be extruded more readily.
If you use the needle approach, be sure that the needle is finer in diameter than the nozzle itself, otherwise, you will damage the nozzle.
Using Coldpull method - To utilize this approach, first heat the 3D printer extruder to around 250°C. (Use a lower temperature, such as 200°C, if using PLA.) While the nozzle is heated, insert the filament into the print head. Allow the nozzle to cool and the filament to solidify before continuing. Then, reheat the extruder to a lower temperature (such as 115°C) and draw the filament up and out of the extruder nozzle as soon as the temperature reaches 90°C. Soft filaments, such as nylon, work well for cold pulls.
The cold pull works if the end of the 3D printer filament is shaped like the interior of the nozzle. This approach is successful due to particle accumulation inside the nozzle. This is to be reiterated to achieve a completely cleaned nozzle.
Using Atomic Pull Method - For cleaning the nozzle, the atomic pull, also known as the atomic technique, is theoretically identical to the cold pull method. Instead of allowing the nozzle to drop to room temperature, it is kept heated at all times. Before commencing this process, remove the original filament from the 3D printer. Set the temperature of the nozzle to 250-260 degrees Celsius (or 220 degrees Celsius if using PLA). When the nozzle has achieved the proper temperature, manually feed filament into the hot end until extrusion begins. Reduce the nozzle temperature to 160°C for ABS and PETG, or 90°C for PLA. Once this temperature is attained, remove the filament from the nozzle.
If the tip of the filament is shaped like the inside of the hot end, the atomic pull method, like the cold pull method, will have worked. This approach may need to be repeated numerous times to remove the debris that is creating the impediment. For its desktop 3D printers, Ultimaker recommends the atomic pull method. If you're using an Ultimaker system or another 3D printer with a Bowden tube that feeds into the nozzle, you may need to remove it before adding the
Acetone Cleaning - If the pulling techniques do not properly clear the nozzle, the hot end of the 3D printer must be removed and cleaned. To clean the nozzle, a solvent such as acetone is often used. Acetone works best when combined with ABS filament. PLA, on the other hand, is soluble in ethyl acetate. [2] To get this effect, just soak the nozzle in acetone or a solvent for a few hours. The filament particles that produced the obstruction should be easy to remove from there.
Replacing the Nozzle - If none of the aforementioned 3D printer nozzle cleaning methods work, it's time to replace the nozzle. In general, you should replace your 3D printer nozzle every three to six months, especially if you use less costly brass nozzles. Before changing a nozzle, begin by heating the hot end and removing any filament from the 3D printer. The heat will make it easier to detach the nozzle using a tool or pliers. Then all that remains is to place the new nozzle into the printer head.
Finally, while clogged 3D printer nozzles are a typical issue for FDM 3D printer users, they are preventable. By taking the necessary precautions, such as keeping your 3D printing environment dust-free and using high-quality filaments, you can limit the chance of nozzle blockages from the start. However, there are ways if your 3D printer nozzle becomes clogged. We demonstrated how to remove a partially or completely blocked 3D printer nozzle with cleaning filament, cold pulling, and acetone solvent.